Kleenex Box Tutorial
Hi, I have had a few requests about how I made my Kleenex box which is part of the teachers desk set that was shown by Xyron on Facebook. I made the pattern as I went along, luckily I did take some pictures of the process but I will include some drawings and measurements of the basic structure, all measurements are approximate. I will attempt to explain it through the photos and diagrams that I drew in publisher and hopefully you will catch my drift!
Products Used
Xyron Wishblade
Doodlebug Paper Plus Kits
DCWV 'The Edumacation Stack'
May Arts Ribbon
Websters Pages Trim
Sillhouette Studio Pattern ( Mini Carrier)
Sillhouette Studio School Die Cuts
Crattime Flatback Buttons
Box making card
HOW THE KLEENEX BOX IS MADE
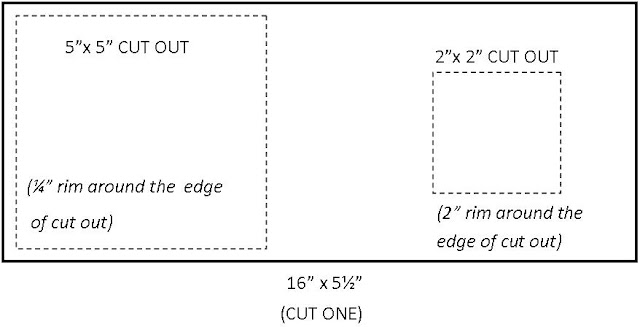
The structure of the Kleenex box is made from box making card that I drew the measurements on and cut with a craft knife. I used hot glue to hold everything together. Here are the pieces needed to make the base
OK I hope that my diagrams have been clear enough to follow so far. From here on in the fun starts with decorating. Grab your Xyron Adhesives and lets get covering!.
To add a realistic effect and make the books looked stacked, I cut strips of paper and using the Xyron Mega Runner joined them together down the edge on the patterned side and then folded them back forming a seam.
I used the Xyron Glue Stick and rubbed adhesive around the protruding edges of the 'book' covers, place the glued seam of the joined pieces of paper along the edges of the 'book' covers and wrap the patterned paper around underneath the book cover edge and pressed down on the top. This should give you one colour on top and the colour of the other book cover underneath.
I Put the final top piece of paper through the Xyron 9" Creative Station and applied, using a craft knife cut the paper over the 2" x 2" hole and fold back inside the box.
The fake page effect is done by cutting out strips of paper coredinations beige cardstock and I distressed it with sand paper.
I used a ruler and a brown gel pen and drew in broken lines very close to each other, apply Xyron Adhesive by running the strips through the Xyron 5" Creative Station and wrap around the box.
I diecut out the subject titles using the Xyron Wishblade. The patterns were downloaded from Silhouette Studio. I ran the pieces through the Xyron 1.5" create-a-sticker and applied to the spines of the books!.
To apply the ribbon around the books, run it through the Xyron 1.5" create-a-sticker and wrap around.
Finish by adding the ribbon bow and tag.
So there you have it, I hope that you enjoyed this tutorial and will come back to my blog again soon, I'd love you to join my followers. Don't forget to check out Xyron, Xyron Facebook and the Xyron Blog for inspirations, competitions and amazing products.
Sharon


this is wonderful Sharon - so clever - thanks for the tutorial xx
ReplyDeleteThanks Rachel xx
DeleteWow Sharonthis is so clever, fabulous engineering here,great tutorial.xxx
ReplyDeleteThanks Doreen x
DeleteThat is nothing short of genius! Absolutely awesome...already pinned it :)
ReplyDeleteThank You Bethx
DeleteI'm confused about, "To add a realistic effect and make the books looked stacked, I cut strips of paper and using the Xyron Mega Runner joined them together down the edge on the patterned side and then folded them back forming a seam." I understand how you are saying you glue them together and fold them back to make a seam, but then where do you put them? What part of the thing does this make?
ReplyDeleteHi Just Me,
DeleteWhen you fold it back rest the fold on the top edge of the 'book'. For example I took a blue and a red strip of paper, glued together down one edge with the patterned facing each other. Then I bent back the unglued edge of the papers, I now rub glue onto the base form along the protruding 'book'edge. I rest the joined edge of the pattered paper on it and wrapped the blue paper underneath and just flatten the red piece down along the top.
Fabulous project!
ReplyDeletethis is awesome, what a clever idea.
ReplyDeleteExcellent tutorial and such a clever idea. Love it. Lots of teachers in my family. I'm going to have to try this one.
ReplyDeletecouldn't you cover each "book" piece first before you stack them all together?
ReplyDeleteDebora, I did the first time but when you glue the pieces together it left gaps, works better covering the fixed pieces, of course it's a personal preference
DeleteAwesome project thank you for sharing!!
ReplyDeleteI love this! I'm wondering where you found the box making card? Thanks!
ReplyDeleteHi Diana
DeleteAny art supply store that stock A3 mount board should have it at the end of the display. The sheets are A3 and have a sheen and are a little thinner than mountboard.
Thank you so much! I will check it out.
Delete